

Bottom line first: the fastest general-purpose way to find a fault on site is the swap test. Take the part you suspect, fit it into an identical machine that is running normally, and watch whether the fault moves with the part. If it does, the part is the cause. If it does not, the part is cleared in a single step. No other field method gives you a yes/no answer that quickly, and none is easier to demonstrate to a customer standing next to you. The method works in electrical work, but equally in mechanical, hydraulic and automation systems, because it does not depend on the industry, only on the existence of a part that can be swapped.
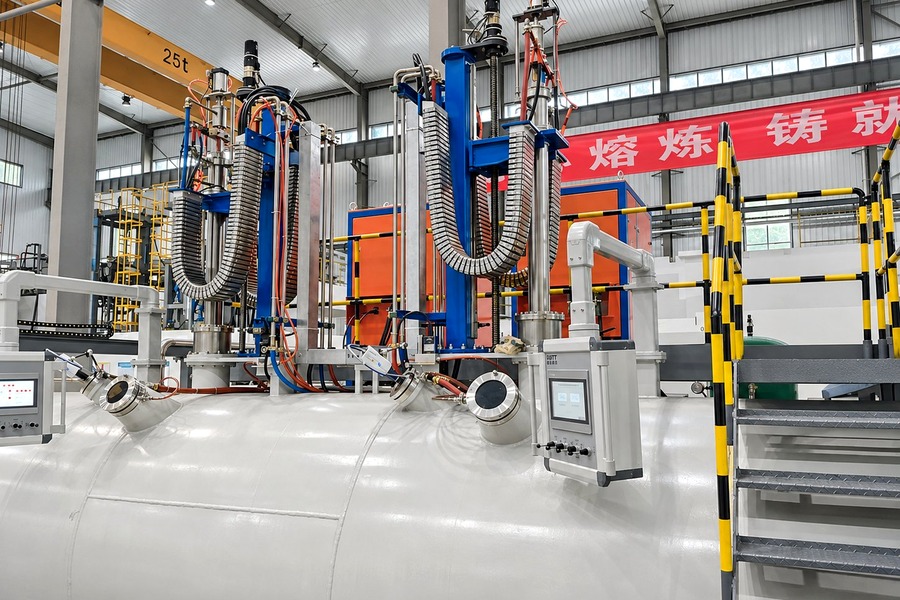
Why do experienced engineers still freeze up on site?
The short answer: not for lack of knowledge, but because the number of unknowns on site is far higher than in a workshop. Convert those unknowns into knowns one at a time and the picture becomes clear.
Any engineer who travels knows how messy a real plant is. Your equipment is usually a small part of the whole process, a single screw in a much larger machine. When something stops working you face equipment you have never seen, control logic you cannot fully read, and supplies and grounding that belong to someone else. All you can observe is a symptom: no arc, unstable output, an alarm, a trip.
There is also a human factor. When a line stops, most customers assume the product they bought is at fault. That is normal behaviour: we all suspect the new component before the old system. It is exactly the moment when arguing is the least useful thing you can do.
Why should attitude come before troubleshooting?
The short answer: fix the conversation before you fix the machine. Do not argue, do not defend, start working. Facts persuade better than explanations.
Winning an argument about whose fault it is costs you the customer's trust and the time you needed for the job. Reverse the order instead: prove with a repeatable test whether the product is or is not involved, and let the customer watch the result. The swap test exists to produce exactly that proof.
How does the swap test work in practice?
The short answer: one exchange, one observation, one boundary drawn. Here is the sequence with a real configuration: two identical plasma welding machines, both fed by KULUN IGBT DC power supplies. One welds normally, the other will not strike an arc.
- State the hypothesis. Assume the DC supply inside the machine that will not arc is the cause. Say it out loud, so the customer knows what is being tested.
- Swap the part. Isolate and lock out, verify the DC bus is discharged, then move the suspect supply into the machine that runs normally.
- Watch one thing only. Does the fault follow the supply, or does it stay with the original machine?
If the healthy machine now fails in the same way, the fault travelled with the supply and the supply is very likely the cause. If the healthy machine keeps running normally, the supply is not the cause, and the search moves immediately to the torch, the gas and cooling circuit, the work-piece connection, the grounding, or the interlock logic of the host machine.
What do "fault follows" and "fault stays" actually tell you?
The short answer: the swap test turns analysis into a decision. The table below fixes both the conclusion and the next action.
| Swap result | What you observe | Conclusion | Next action |
|---|---|---|---|
| Fault follows the part | The suspect supply in the healthy machine reproduces the same fault | The part itself is faulty | Open the unit, inspect the power stack and control board, return for repair if needed |
| Fault stays behind | The suspect supply runs normally in the healthy machine | The part is cleared | Check the system side: load, gas, cooling, wiring, grounding, external conditions |
| Cross-check agrees | The healthy machine's supply in the faulty machine still fails | The problem sits in the system or the load | Isolate in sections and narrow the boundary step by step |
The third row is worth the extra half hour. When both directions agree, the conclusion is solid enough to put in a service report and to show the customer, and nobody has to rely on opinion.
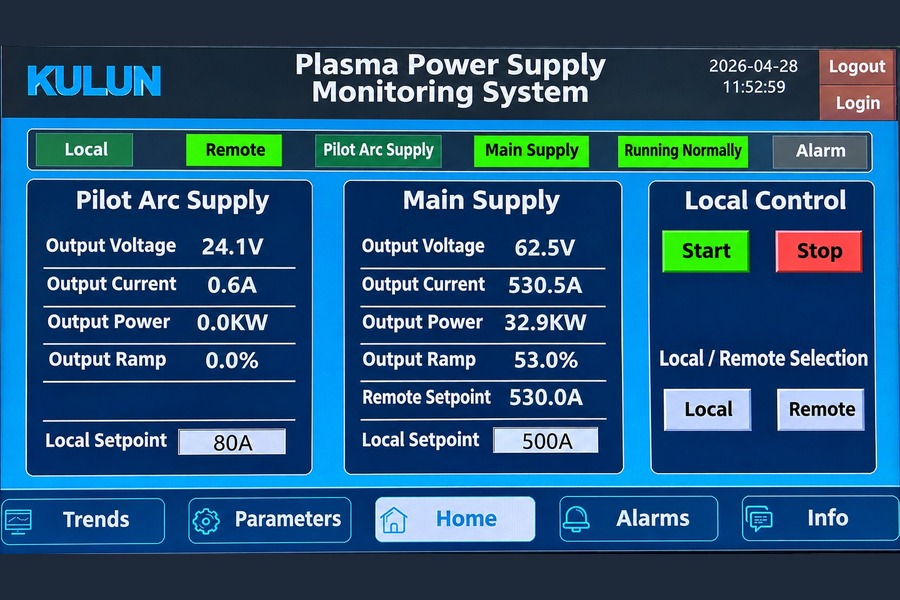
What should the screen show you before you swap anything?
The short answer: confirm which channel has no output first; it can save half the dismantling. On the plasma monitoring system above, read three groups of data in this order.
- Did both channels establish output? Pilot arc supply and main supply are reported separately. A pilot arc supply sitting near zero power while the main supply carries load places the fault on the pilot arc side, not in the main power stage.
- Do setpoint and actual agree? Compare remote setpoint, local setpoint and measured output. A setpoint that is present while the output does not follow points to the reference signal or the enable conditions; three values that agree while the process still fails point to the load side. A slow output ramp can also look like "it will not come up" when nothing is wrong.
- Which mode is the unit in? Local or remote, pilot arc or main, running or alarm. In remote mode the local start button does nothing, and that is a setting, not a fault.
The screen tells you which channel is missing and how far setpoint and actual have drifted apart. The swap test tells you whether the part is good. Used together they form a complete argument.
Why do most people analyse the whole system instead?
The short answer: the instinct to analyse everything at once is the problem, not the technical knowledge.
The usual pattern is to open a full investigation: check this, measure that, replace a handful of parts, and still have no conclusion, with a customer demanding a new unit in the meantime. The swap test works precisely because it asks nothing about the internals of unknown equipment. It only asks whether something comparable exists on site.
| Item | Analyse the whole system first | Draw a boundary with a swap first |
|---|---|---|
| Starting point | Suspect every signal at once | Suspect one part at a time |
| Prerequisite | Familiarity with every unit and drawing on site | A comparable part or unit |
| Typical process | Measure here, replace there, variables stack up | One exchange, one observation |
| Type of answer | A list of possibilities | A yes/no result you can demonstrate |
| Time cost | High, often repeated | Low, one test sets the direction |
| Best fit | One-off systems with nothing to compare | Repeated machines, modular systems |
What if there is only one machine on site?
The short answer: make the swap smaller, or cut the system into sections. The method survives without a second machine.
- Borrow a part. A sister line, a spare in the warehouse or a unit from the supplier is enough for a short exchange. A few hours of running is all the evidence you need.
- Isolate in sections. Split the system into supply, control and load, then disconnect or bypass one section at a time. The section where the symptom disappears is the boundary.
- Run a minimum system. Take the suspect unit off the plant and load it with a known-good load. If it behaves, the problem is on the system side; if it does not, it is in the unit.
What makes a swap test valid?
The short answer: safety and discipline decide whether the result means anything.
- Isolate and discharge. Lock out before dismantling, and allow the DC bus capacitors the full discharge time stated in the manual.
- Record parameters. Photograph or write down every setting and every terminal before removal, then verify them after refitting. Otherwise you solve the fault and lose the configuration.
- Change one variable at a time. One part per test. Two simultaneous changes make the result unreadable.
- Keep conditions comparable. Both machines should see the same supply quality and a similar load, or "follows or stays" becomes a guess.
FAQ
Does the swap test only work for electrical faults?
No. It applies to any system built from separable parts: a power module or control board in a cabinet, a valve, sensor or actuator in a machine, a whole unit on a production line. The principle is the same in every case, replacing an open-ended analysis with one physical exchange. The more unfamiliar the system, the more time it saves.
If the fault does not follow the part, is the product fully cleared?
The part itself is cleared, but confirm two things. First, run the reverse direction: fit the healthy machine's supply into the faulty machine and check that the fault persists. Second, review supply quality, grounding and operating conditions, because some faults only appear under a specific load or a specific supply distortion. Factory test records for the unit are useful supporting evidence to show the customer at the same time.
What if the customer insists on a replacement unit?
Do not argue; turn the swap test into a demonstration both sides watch. Whether the fault follows the part is visible in a few minutes. If the test clears the product, discuss the real cause with that result in hand. If the product is genuinely at fault, follow the service process. Either way the conversation starts from evidence rather than opinion.
There is only one machine and no spare part. What then?
Reduce the size of the swap or cut the system apart. Borrow a matching part for a short exchange, isolate supply, control and load in turn to see where the symptom disappears, or run the suspect unit with a known-good load as a minimum system. The rule stays the same: change one variable per step and record the state before and after.
When does the swap test not apply?
When nothing comparable exists and the system cannot be sectioned. In that case return to instrumentation and first-principles analysis: draw the block diagram, list the expected value of every signal, then verify stage by stage on a minimum system. It is slower, but still far more efficient than measuring at random.
Can a swap test damage the healthy machine?
Not when it is done properly. Isolate and discharge before dismantling, respect the capacitor discharge time on DC circuits, record parameters before removal and verify them after refitting, and keep both machines under comparable conditions. Treated that way, a swap test is no more stressful for the healthy unit than routine maintenance.
Timeliness note
This article reflects KULUN's field service practice and product documentation as of November 2026, and is intended for the first stage of fault localisation on industrial sites. Always follow the manual and the site safety rules for dismantling steps, discharge times and lock-out procedure. Parameters and menu paths differ between models.